Abstract
This document provides a comprehensive examination of the methodology required to install compression fittings on galvanized steel pipe without the use of traditional threading techniques. It addresses the unique material properties of aged galvanized pipe, which often preclude standard threading due to wall thinning and corrosion. The analysis delves into the mechanical principles governing the function of a compression fitting, detailing the role of the nut, ferrule, and fitting body in creating a durable, watertight seal. The procedural guide emphasizes meticulous preparation, including precise cutting and deburring of the pipe, as essential prerequisites for a successful installation. It presents a systematic, five-step process that covers tool selection, pipe preparation, fitting assembly, proper tightening protocols, and leak-testing procedures. By contextualizing the practical steps within a framework of material science and mechanical physics, this guide seeks to empower both novices and experienced practitioners to execute reliable, long-lasting repairs on challenging plumbing systems, thereby offering a viable and effective alternative to more complex and often impractical pipe-threading methods.
Key Takeaways
- Ensure the galvanized pipe is cut perfectly square and thoroughly deburred for a proper seal.
- Assemble the fitting components in the correct order: nut, then ferrule, onto the pipe.
- Tighten the compression nut one to one-and-a-quarter turns past finger-tight.
- Use two wrenches—one to hold the fitting body and one to turn the nut—to prevent torque stress.
- This step-by-step guide to installing compression fittings on galvanized pipe without threading ensures a reliable repair.
- Slowly re-pressurize the system and meticulously check for any signs of leaks after installation.
- For larger industrial projects, consider professional-grade grooved pipe fittings as a robust alternative.
Table of Contents
- The Philosophical Underpinnings of Repair: Why This Skill Matters
- Step 1: Foundational Preparations for a Secure Connection
- Step 2: The Art and Science of a Perfect Pipe Cut
- Step 3: The Order of Operations: Assembling the Compression Fitting
- Step 4: The Art of Torque: Achieving the Perfect Tightness
- Step 5: Verification and Finalization: Testing Your Work
- Advanced Considerations: When and Why to Explore Alternatives
- Frequently Asked Questions (FAQ)
- Conclusion
- References
The Philosophical Underpinnings of Repair: Why This Skill Matters
Before we immerse ourselves in the practicalities of wrenches and fittings, it is worth pausing to consider the nature of the task at hand. Working with old galvanized pipe is not merely a mechanical act; it is an engagement with history, a dialogue with the material choices of a previous generation. These pipes, relics of a mid-20th-century building boom, carry within their zinc-coated steel walls a story of progress, ambition, and, ultimately, the slow, inevitable march of entropy. To repair them is to intervene in this narrative, to assert our capacity to restore function and extend the life of the systems that quietly support our daily existence. The challenge lies in the fact that galvanized pipe, as it ages, becomes a poor candidate for its original method of connection: threading. The very process of cutting new threads can compromise the pipe’s thinning, corroded walls, turning a simple repair into a cascade of failures.
A Historical Interlude: The Rise and Fall of Galvanized Pipe
To truly understand the material you are about to manipulate, we must briefly step into the past. Galvanized steel pipe, which is steel pipe dipped in a protective zinc coating, was once hailed as a major advancement over the lead pipes it replaced. For several decades in the post-war era, it was the standard for residential water supply lines. The zinc was intended to act as a sacrificial anode, corroding away over time to protect the steel pipe from rust (American Galvanizers Association, 2022). The theory was sound, but the practice, over a long enough timeline, proved problematic. The very minerals in the water that flowed through them began to build up, and the zinc coating slowly deteriorated, exposing the steel beneath. This leads us to the situation many homeowners face today: pipes that are constricted, corroded, and fragile. Imagine the pipe not as a simple conduit, but as an aging veteran, its armor thinned and its strength compromised by decades of service.
The Inevitable Corrosion: A Lesson in Electrochemistry
The problem with aged galvanized pipe is rooted in a fundamental scientific principle: galvanic corrosion. When the protective zinc layer is breached, and the underlying steel is exposed to water, a tiny electrochemical cell is created. The zinc, being more electrochemically active, corrodes in preference to the steel, but this process also releases corrosion byproducts into the water stream. These byproducts, along with mineral deposits from the water itself, form a thick, irregular scale on the inside of the pipe. This scale, known as tuberculation, not only restricts water flow but also hides a surface that is pitted, uneven, and structurally weakened. Attempting to use a heavy, powerful threading die on such a surface is akin to performing intricate surgery with a sledgehammer. The force required can easily cause the brittle pipe to crack, split, or collapse entirely.
The Compression Fitting: An Elegant Solution for a Vexing Problem
Herein lies the profound elegance of the compression fitting. Unlike a threaded fitting, which requires the pipe itself to be reshaped to form a seal, the compression fitting imposes its own sealing mechanism onto the pipe’s exterior. It is a solution born of empathy for the material’s condition. It does not demand that the old pipe become something it is not; instead, it gracefully accommodates its imperfections. The fitting consists of three core components: the main body, a compression nut, and a soft metal ring called a ferrule or “olive.” The genius of the design is that as the nut is tightened, it forces the ferrule to clamp down onto the outer surface of thepipe, deforming slightly to create an incredibly tight, permanent, and waterproof seal. It bypasses the need for threads entirely, making it the ideal tool for our purpose. Learning how to install compression fittings on galvanized pipe without threading is not just learning a plumbing trick; it is learning a more respectful and effective way to engage with aging infrastructure.
Step 1: Foundational Preparations for a Secure Connection
Success in this endeavor is predicated not on brute force, but on meticulous preparation. Every step you take before you even touch the fitting itself contributes to the final integrity of the seal. A rushed or careless approach at this stage will almost certainly manifest as a frustrating, persistent drip later on. Think of this phase as a surgeon preparing their operating theater: every tool must be correct, the field must be clean, and the patient—in our case, the pipe—must be properly readied.
Safety as a Prerequisite: Protecting Yourself and Your Property
Your first and most important consideration must be safety. You will be working with tools that can cut and applying force that can cause components to slip. Water damage is also a significant risk.
- Personal Protective Equipment (PPE): At a minimum, you must wear safety glasses. Cutting metal can send small, sharp fragments flying. Sturdy gloves are also essential to protect your hands from the sharp edges of a cut pipe and to provide a better grip on your tools.
- Water Containment: Before you make any cuts, have a bucket and several old towels ready. Even after you shut off the main water supply, the pipes will contain a surprising amount of residual water. Positioning the bucket directly under your work area is a non-negotiable step to prevent water damage to floors, subfloors, and ceilings below.
Assembling Your Toolkit: The Instruments of a Successful Repair
Having the correct tools, clean and in good working order, is half the battle. Scrambling to find the right wrench mid-installation is a recipe for error. Below is a table outlining the essential and recommended tools for this task.
| Tool | Purpose | Key Considerations |
|---|---|---|
| Pipe Cutter | To make a clean, square cut on the galvanized pipe. | A heavy-duty model designed for steel pipe is essential. A small cutter for copper will not work and will be damaged. |
| Two Adjustable Wrenches | One to hold the fitting body steady, one to tighten the compression nut. | Choose large wrenches (10-12 inches) to provide adequate leverage without excessive strain. Ensure the jaws are in good condition. |
| Deburring Tool | To remove the sharp inner and outer rim left after cutting. | A simple pencil-style reamer or a half-round file will suffice. This step is critical for a leak-proof seal. |
| Tape Measure & Marker | For precise measurement and marking of the pipe. | A permanent marker is ideal as it will not wash away with residual water. |
| Bucket & Towels | To catch residual water and for cleanup. | Essential for preventing water damage. |
| Wire Brush | To clean the exterior of the pipe where the fitting will sit. | A stiff-bristled brush is needed to remove surface rust, paint, and grime, ensuring the ferrule can seat properly. |
The Critical First Move: Shutting Off Water and Draining the System
This step is absolute. Locate the main water shut-off valve for your property and close it completely. This is often found where the main water line enters the building, typically in a basement, crawl space, or utility closet. Once the main valve is closed, open the lowest faucet in the house (like a basement utility sink or an outdoor spigot) and the highest faucet (like a second-floor bathroom). This allows air to enter the system, breaking the vacuum and permitting the water to drain out of the pipes much more effectively. Let it drain until the flow stops. Only then is it safe to proceed with cutting the pipe.
Measuring Twice: The Carpenter’s Rule in a Plumber’s World
Precision is paramount. You need to determine the section of pipe you are removing and the space your new fitting will occupy. Hold the compression fitting up to the pipe. Note how much of the pipe will slide into the body of the fitting on each side. This is called the “insertion depth.” Your goal is to cut out a section of damaged pipe that is exactly the length of the new fitting’s body, minus the combined insertion depth of both ends.
Let’s create a mental exercise. Suppose the body of your new fitting is 4 inches long, and the pipe inserts 1/2 inch into each end. You would not cut out a 4-inch section of old pipe. Instead, you would add the two insertion depths (0.5 + 0.5 = 1 inch) to the length of the fitting body (4 inches), for a total of 5 inches of pipe that the completed assembly will span. The gap you need to cut in the existing pipe is the length of the fitting body itself, 4 inches. Measure this gap carefully and mark the pipe clearly at both ends of the section to be removed. A clear, precise line will guide your cut and ensure the new fitting fits perfectly without stressing the adjacent pipes.
Step 2: The Art and Science of a Perfect Pipe Cut
The quality of your cut is the single most important factor in determining whether your connection will be successful. A sloppy, angled, or ragged cut creates a surface that the ferrule cannot seal against uniformly. The objective is a cut that is perfectly perpendicular—or “square”—to the length of the pipe.
The Principle of the Square Cut: Why It Is Non-Negotiable
Imagine the ferrule, that small brass ring, as a gasket that must make 360 degrees of perfect contact with the pipe. If the cut is angled, the pipe end will not sit flush inside the fitting’s body. When you tighten the nut, the ferrule will be driven forward onto a surface that is not level. It will make tight contact on the “high” side of the angle but may have insufficient contact on the “low” side. This creates a microscopic channel through which water, under pressure, will inevitably find a path. Furthermore, an angled cut can cause the pipe to sit crookedly within the fitting, placing uneven stress on the entire assembly. A square cut is the foundation upon which a leak-proof seal is built.
Choosing Your Weapon: A Comparison of Cutting Tools
You have several options for cutting galvanized pipe, but for this specific application, one is clearly superior.
- Hacksaw: A hacksaw can work, but it is extremely difficult to achieve a perfectly square cut by hand. The blade tends to wander, and the resulting edge is often rough and requires significant cleanup. It should be considered a last resort.
- Reciprocating Saw (Sawzall): This is a faster option than a hacksaw, but it shares the same problem: it is very challenging to maintain a square cut. The vibration and power of the tool make precision difficult, and the cut edge will be very rough.
- Angle Grinder with a Cut-off Wheel: This is the fastest method, but also the most dangerous and messy. It throws a shower of hot sparks and leaves a very rough, burred edge that must be meticulously cleaned and smoothed. It is generally not recommended for in-place plumbing repairs inside a home.
- Hinged Pipe Cutter or Ratcheting Pipe Cutter: This is, without question, the best tool for the job. This type of cutter features multiple cutting wheels that are brought to bear on the pipe as you ratchet the handle. It is specifically designed to make clean, square cuts on steel pipe, even in tight spaces. While it represents a greater initial investment, its ability to produce a perfect cut every time makes the entire process of installing compression fittings on galvanized pipe without threading significantly easier and more reliable.
Executing the Cut: A Practical Walkthrough
Assuming you are using the preferred tool, a pipe cutter, the process is methodical and requires patience.
- Position the Cutter: Open the jaws of the cutter and place it on the pipe, aligning the cutting wheels precisely with your first marker line.
- Apply Initial Tension: Tighten the handle on the cutter until the wheels bite firmly into the pipe. The goal is firm contact, not to crush the pipe.
- Rotate and Tighten: Begin to rotate the cutter around the pipe. If you have a ratcheting model, you will simply work the handle back and forth. After one or two full rotations, tighten the handle another quarter-turn.
- Repeat the Process: Continue this pattern: rotate, tighten, rotate, tighten. You will feel the cutter sinking deeper into the steel. Do not try to rush this by over-tightening. Let the tool do the work. A cutting oil can make this process smoother but is not strictly necessary.
- The Final Snap: Eventually, the cutter will slice through the pipe, which will separate with a clean snap. Repeat the process for your second mark to remove the damaged section.
Deburring: The Unsung Hero of a Leak-Proof Seal
After the cut, you will be left with a sharp, raised lip on both the inside and outside of the pipe’s edge. This is called a “burr.” Failing to remove it is a common and critical error. An external burr can prevent the ferrule from sliding on smoothly and seating correctly. An internal burr can flake off into the water system and clog aerators or valves downstream. More importantly, the sharp edge of the burr can score or damage the soft brass of the ferrule as it is compressed, creating a potential leak path.
Use your deburring tool or a half-round file. Insert the tool into the pipe and rotate it to shave off the inner burr. Then, work the tool or file around the outside edge to smooth the outer burr. The goal is a clean, smooth, slightly chamfered edge. Run your finger (carefully!) over the edge. It should feel smooth, not sharp. This small, often-overlooked step is a hallmark of professional work.
Step 3: The Order of Operations: Assembling the Compression Fitting
With the pipe perfectly prepared, the assembly of the fitting is straightforward, but the sequence of parts is absolutely critical. Getting it wrong means the fitting will not seal, and you will likely have to cut the pipe again and start over, as the ferrule, once compressed, is not easily removed or reused.
Anatomy of a Seal: The Body, the Ferrule, and the Nut
Let’s revisit our three key players and their roles.
- The Body: This is the central component of the fitting, with a threaded section on each end and an internal “shoulder” against which the pipe and ferrule will seat. It is the bridge connecting the two pipe ends.
- The Compression Nut: This is the component that provides the force. As it is screwed onto the body’s threads, it drives the ferrule forward.
- The Ferrule (or Olive): This is the heart of the seal. It is a small ring, typically made of brass, which is a softer metal than the galvanized steel pipe. It is designed to deform under pressure. Its shape is often tapered or beveled to match the inside of the fitting body, which focuses the compressive force onto a narrow band of the pipe’s surface.
The Correct Sequence: A Simple Litany to Prevent Failure
The order of assembly is immutable. For each pipe end you are connecting, you must slide the components on in the following order. Burn this into your memory:
- Nut First: The compression nut goes onto the pipe first. Make sure the threads of the nut are facing toward the end of the pipe where the fitting will be.
- Ferrule Second: The ferrule goes onto the pipe next. It should slide on easily. Pay attention to its orientation; if it has a tapered edge, that taper should face the fitting body, ready to slide into its matching seat.
A common mistake is to put the ferrule on before the nut. If you do this, you will have no way to tighten the assembly. Another mistake is to put the ferrule on backward. This will prevent it from seating correctly in the fitting body, and it will not seal.
Seating the Components: Ensuring Everything Is in Its Rightful Place
Once the nut and ferrule are on the pipe, you are ready to connect to the fitting body.
- Clean the Pipe Surface: Take your wire brush and give the last few inches of the pipe, where the ferrule will sit, a final, vigorous cleaning. The surface must be free of all rust, paint, dirt, or grime. The ferrule needs to seal against clean, bare metal.
- Insert the Pipe: Slide the pipe end all the way into the fitting body until it stops against the internal shoulder. You should feel a distinct “thunk” as it seats. This ensures the pipe is fully supported and correctly positioned.
- Slide Components Forward: Slide the ferrule and then the nut forward until they make contact with the fitting body. The ferrule should slide neatly into the tapered opening of the body.
At this point, you are ready for the final and most technique-sensitive step: tightening the fitting to create the seal.
Step 4: The Art of Torque: Achieving the Perfect Tightness
This is the moment where technique and feel triumph over raw power. The goal is to tighten the compression nut enough to deform the ferrule and create a permanent, watertight seal, but not so much that you damage the fitting, the ferrule, or the pipe itself. This step in our step-by-step guide to how to install compression fittings on galvanized pipe without threading requires a delicate touch.
The Physics of Compression: How the Seal Is Formed
Let’s visualize what is happening on a microscopic level. As you turn the nut, its internal threads engage with the external threads of the fitting body. This action pushes the nut forward. The nut, in turn, pushes against the back of the ferrule. The front of the ferrule is pushed into the tapered seat inside the fitting body. Trapped between the advancing nut and the stationary seat, the soft brass of the ferrule has nowhere to go but inward. It compresses, bites into, and deforms around the hard steel of the galvanized pipe. This deformation fills any microscopic imperfections on the pipe’s surface and creates a 360-degree metal-to-metal seal that is incredibly strong and impervious to water. It is a masterful piece of simple mechanical engineering.
The “Finger-Tight Plus” Method: A Reliable Rule of Thumb
The most widely accepted method for tightening a compression fitting, especially for a first-time installer, is the “turns past finger-tight” method.
- Finger-Tighten: With the pipe fully seated and the nut and ferrule in place, tighten the compression nut by hand. Turn it until it is as tight as you can get it using only your fingers. This is your “zero point.”
- Mark the Nut: Take your permanent marker and draw a line on one of the flat faces of the nut and continue that line onto the body of the fitting. This gives you a clear visual reference for how much you have turned the nut.
- Apply the Wrench: Now, using your wrench, tighten the nut further. The standard recommendation for most brass compression fittings on steel pipe is one to one-and-a-quarter full turns past finger-tight. Watch your reference mark. When it has gone around completely one time and is back at its starting point, that is one full turn. Continue for another quarter turn if needed.
For most standard water pressures, one full turn is often sufficient. The extra quarter turn provides an additional margin of safety. Do not be tempted to go further.
The Perils of Over-Tightening: A Cautionary Tale
It is a natural, intuitive impulse to think that “tighter is better.” In the world of compression fittings, this is a dangerous fallacy. Over-tightening is the most common cause of failure. Here is what happens when you apply too much force:
- Ferrule Damage: You can deform the ferrule so much that it becomes thin and brittle, potentially cracking under the strain. Or, you can compress it so hard that it loses its ability to flex with tiny temperature and pressure changes, eventually leading to a leak.
- Pipe Damage: While galvanized steel is strong, it is possible to apply so much force that the ferrule actually crushes or bites too deeply into the pipe wall. On an already aged and corroded pipe, this can create a stress point that may lead to a crack and catastrophic failure down the line.
- Fitting Damage: You can strip the brass threads on the nut or the fitting body, ruining the entire component.
It is far better to slightly under-tighten and have to give the nut a tiny extra nudge later than to over-tighten from the start. You cannot undo an over-tightened fitting; the damage to the ferrule is permanent.
Wielding Two Wrenches: The Technique for Stability and Control
You must always use two wrenches to tighten a compression fitting. This is not optional. One wrench (your “holding” wrench) is placed on the flat spots of the fitting body to hold it perfectly still. The second wrench (your “turning” wrench) is placed on the nut.
Why is this so critical? The fitting body is connected to the pipe. If you only use one wrench on the nut, the torque you apply will not just tighten the nut; it will also try to twist the entire fitting body and the pipe it is attached to. This twisting force can damage joints and connections further down the line, turning a small repair into a much larger problem. By using a second wrench to hold the body steady, you ensure that 100% of the force you apply with your turning wrench goes into compressing the ferrule, which is exactly what you want. This two-wrench technique isolates the force to the single joint you are working on, protecting the integrity of the rest of your plumbing system.
Step 5: Verification and Finalization: Testing Your Work
You have prepared, cut, assembled, and tightened. Now comes the moment of truth. A successful test is the final confirmation of your craftsmanship. As with the preceding steps, this process should be done slowly and methodically.
A Gradual Reintroduction: Turning the Water Back on Slowly
Do not simply go to the main valve and crank it open. Suddenly introducing a surge of high-pressure water into a dry system can cause a phenomenon known as “water hammer,” a loud banging sound that sends a shockwave through the pipes. This shockwave can be powerful enough to damage joints, including the one you just made.
The correct procedure is to first ensure all the faucets you opened to drain the system are still open. Then, go to the main water shut-off valve and open it only a quarter of the way. You will hear the sound of water beginning to refill the pipes. Let it run for a minute or two. This allows the pipes to fill slowly and the air to be pushed out through the open faucets. Once water is flowing steadily from the open faucets, you can go back and open the main valve the rest of the way. Finally, close the faucets one by one, starting with the lowest one first. The system is now fully pressurized.
The Vigilant Watch: Methods for Detecting the Smallest Leaks
Now, all your attention should be on the new fitting. Even the smallest, most infrequent drip is a sign of failure that must be addressed. Water will find a way, and a small drip today can become a significant leak tomorrow.
- Visual Inspection: Look closely at the points where the nut meets the fitting body on both sides. Watch for even the tiniest bead of water forming.
- The Paper Towel Test: This is the most reliable method. Take a dry piece of paper towel and wipe it completely around each joint of the new fitting. The paper will instantly show any trace of moisture that might be invisible to the naked eye. Check the fitting immediately after pressurizing, and then again after 5 minutes, 15 minutes, and an hour. Some very slow leaks take time to appear.
| Problem | Potential Cause | Solution |
|---|---|---|
| Drip from the nut | The nut is slightly under-tightened. | Using two wrenches, give the nut a very small additional turn (no more than 1/8th of a turn). Re-test. |
| Drip persists | The ferrule is not seated correctly, or the pipe surface was not clean. | The water must be shut off and the fitting disassembled. Inspect the ferrule and pipe. Clean the pipe again and reassemble. |
| Leak from a crack | The fitting or pipe was damaged by over-tightening. | This is a critical failure. The water must be shut off immediately. The damaged section of pipe or fitting must be cut out and replaced. |
Addressing Imperfections: What to Do If You Find a Drip
If your paper towel test reveals a leak, do not panic. If it is a slow drip from around the nut, the most likely cause is slight under-tightening. Using your two-wrench technique, give the nut a very small incremental turn—think in terms of one-eighth of a turn at a time. Wipe the joint dry and test again. Often, this small adjustment is all that is needed.
If the leak persists after a small adjustment, it indicates a more fundamental problem. The ferrule may be misaligned, the pipe surface may have had a tiny piece of debris on it, or there may be a scratch on the pipe. In this case, you must shut off the water, drain the pipe, and disassemble the connection. You will not be able to reuse the ferrule, as it has already been deformed. You will need to remove the old ferrule (this can sometimes be done with a special tool called a ferrule puller, or by carefully cutting it off) and start again with a new ferrule on a clean section of pipe. This is why getting it right the first time is so important. This methodical approach is the core of a successful installation when you need to install compression fittings on galvanized pipe without threading.
Advanced Considerations: When and Why to Explore Alternatives
While the compression fitting is a remarkably versatile tool, it is not a universal panacea. Understanding its limitations is as important as understanding its application. There are situations where a different type of connection is not just preferable, but necessary for safety and long-term reliability.
Limitations of Compression Fittings: When to Choose Another Path
Compression fittings are at their best in accessible locations with stable, moderate pressures and temperatures, typical of most residential water supply lines. However, they are generally not recommended for the following applications:
- Concealed Locations: You should never install a compression fitting inside a wall, ceiling, or floor where it cannot be visually inspected. While a properly installed fitting is very reliable, all mechanical joints are potential points of failure over time. All plumbing codes mandate that such fittings must be accessible.
- High Vibration Environments: In systems subject to significant vibration, such as connections to heavy machinery or pumps, the constant movement can slowly work the compression nut loose over time, leading to leaks. A brazed, welded, or flanged connection is superior in these cases.
- Very High-Pressure Systems: While robust, standard brass compression fittings have pressure limits. For systems involving very high hydraulic or pneumatic pressures, specialized fittings rated for that pressure must be used.
- Gas Lines: This is an absolute prohibition. Standard water-grade compression fittings must never be used for natural gas or propane lines. Gas requires specialized fittings (often flare fittings or other specific types) to ensure an absolutely gas-tight seal. Using the wrong fitting for gas can have catastrophic consequences.
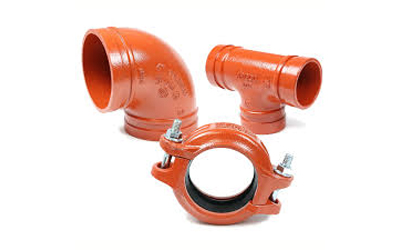
An Introduction to Industrial Solutions: The World of Grooved Fittings
When dealing with larger diameter pipes (typically 2 inches and above), especially in commercial or industrial settings like fire suppression systems or large-scale HVAC, compression fittings become impractical. In this realm, the dominant threadless technology is the grooved pipe system. Manufacturers like Jianzhi are leaders in this field, producing a wide array of grooved couplings and fittings (Jianzhi Pipe Fittings, 2024).
The concept is brilliantly simple: a groove is cold-rolled or cut near the end of each pipe. A two-piece coupling containing a rubber gasket is then placed over the two pipe ends, and the coupling’s housing engages with the grooves. As bolts are tightened, the housing clamps down, compressing the gasket to create a secure, flexible, and leak-proof seal. This system allows for rapid assembly and disassembly and can accommodate a degree of pipe movement and misalignment, which is a significant advantage in large structures. While the tools to create the grooves represent a professional-grade investment, the reliability and speed of the system are unmatched for large-scale projects (Jianzhi Grooved Coupling, n.d.).
The Question of Reusability: Can You Take It Apart and Put It Back Together?
This is a frequent and important question. The short answer is no, a compression fitting is not designed to be reused. Specifically, the ferrule is a single-use component. Once it has been compressed and has bitten into the pipe, it has been permanently work-hardened and deformed. If you disassemble the joint and then try to re-tighten it, the ferrule will not be able to deform further to create a new, perfect seal. It is very likely to leak.
If you must disassemble a compression joint, you should always plan on replacing the ferrule. The nut and the fitting body can typically be reused if their threads are in good condition. To make a repair, you will need to shut off the water, remove the old ferrule from the pipe, and install a new one. This reinforces the importance of a careful, methodical initial installation. Having a few spare ferrules and nuts, or even complete galvanized pipe compression fittings, on hand can be a wise precaution.
Frequently Asked Questions (FAQ)
1. Do I need to use plumber’s tape or pipe dope on a compression fitting?
No, and you absolutely should not. This is a very common misconception. The seal in a compression fitting is a metal-to-metal seal created by the ferrule deforming onto the pipe. The threads on the nut and body are only there to provide the clamping force; they do not form part of the seal. Adding tape or sealant to the threads can lubricate them, which may cause you to accidentally over-tighten the fitting. It can also interfere with the proper seating of the components.
2. What is the difference between a brass and a stainless steel compression fitting?
Brass is the most common material for compression fittings used in residential plumbing. It is relatively inexpensive, easy to machine, and provides excellent corrosion resistance for typical water applications. Stainless steel fittings are more expensive but offer superior strength and corrosion resistance. They are typically used in more demanding industrial, marine, or food-grade applications where higher pressures or corrosive fluids are involved. For repairing a home’s galvanized water pipe, a brass fitting is perfectly suitable and is the standard choice.
3. The galvanized pipe is slightly out of round. Can I still use a compression fitting?
This is a challenging situation. A compression fitting relies on the ferrule making uniform 360-degree contact. If the pipe is significantly oval-shaped, the ferrule may not be able to seal the gaps. Minor imperfections may be overcome by the deformation of the brass ferrule. If you encounter this, ensure the pipe is as clean as possible and tighten the fitting following the standard procedure. Test it with extreme care. If it leaks, a compression fitting may not be a viable option, and you may need to consider cutting back to a more stable section of pipe or using a different type of repair coupling.
4. Can I connect a galvanized pipe to a copper pipe using a standard compression fitting?
Yes, a standard brass compression fitting is an excellent way to transition between galvanized steel and copper pipe. This is a very common plumbing task. The brass body of the fitting acts as a dielectric union, helping to separate the two dissimilar metals (steel and copper). When steel and copper are in direct contact in the presence of water, it creates aggressive galvanic corrosion that will quickly destroy the galvanized pipe. The brass fitting mitigates this, making it a safe and effective way to join the two different materials.
5. How long will a properly installed compression fitting last on a galvanized pipe?
A meticulously installed compression fitting can be considered a permanent repair, capable of lasting for many decades. The lifespan of the fitting will likely exceed the remaining lifespan of the old galvanized pipe to which it is attached. The key is the quality of the installation. A clean, square cut, proper assembly, and correct tightening are the ingredients for a seal that will remain stable and leak-free for the long term.
Conclusion
The ability to install a compression fitting on an old, threadless galvanized pipe is more than just a useful plumbing skill; it is an act of practical empowerment. It represents the capacity to intervene effectively in the hidden systems of our homes, to solve a problem that can otherwise seem daunting and expensive. By eschewing the brute force of threading for the finessed, mechanical elegance of compression, you are working with the aged material, not against it. This guide has sought to illuminate not just the “how” but the “why” behind each step—from the historical context of the pipe itself to the physics of the seal. The principles of meticulous preparation, precise cutting, methodical assembly, and judicious tightening are the pillars of a successful outcome. Armed with this understanding, you are no longer simply following instructions; you are engaging in a thoughtful craft, capable of creating a durable, reliable, and professional-quality repair that will stand the test of time.
References
American Galvanizers Association. (2022). Zinc Coatings. American Galvanizers Association. Retrieved from
Jianzhi Grooved Coupling. (n.d.). About Us. Jianzhi Grooved Coupling. Retrieved from
Jianzhi Pipe Fittings. (2023, May 25). JIANZHI Grooved Fittings – A Leading Pipe Fitting Producer In China. Jianzhi Pipe Fittings. Retrieved from 2023/05/25/jianzhi-grooved-fittings-a-leading-pipe-fitting-producer-in-china/
Jianzhi Pipe Fittings. (2024, August 29). China Grooved Pipe Fittings factory. Jianzhi Pipe Fittings. Retrieved from
Jianzhi Pipe Fittings. (n.d.-a). Galvanized Pipe Fittings. Jianzhi Pipe Fittings. Retrieved from https://www.jianzhipipefitting.com/
Jianzhi Pipe Fittings. (n.d.-b). Grooved Fittings. Jianzhi Pipe Fittings. Retrieved from
Hebei Jianzhi Casting Group Co., Ltd. (n.d.). Hebei Jianzhi Casting Group Co., Ltd. Malleable Iron Pipe Fitting. Retrieved from